For Review
Review the climb-out and exit procedures. Improving your setup, launch, and flyaway on each jump will prepare you for a solo exit in Category D.
Review the stability recovery and maintenance procedure: heading, altitude, arch, legs, relax (HAALR). First recognize your heading to confirm you are not turning. Know your altitude by reading the altimeter (AFF and tandem) or counting from exit (IAD and static line). Arch at the hips to improve belly-to-wind stability. Check your leg position—extended to 45 degrees with toes pointed—and adjust as needed. Relax by taking a breath in and out, letting go of unwanted body tension.
IAD and static-line students: HAALR might be new to you, as this applies only after you’ve made a successful clear and pull.
New Stuff
AFF students: If you now have only one AFF instructor, the instructor will revise the climb-out procedure for your exit. With one instructor, you may prepare for slightly different results after the launch, as it typically flies vertically a little longer than it would with two instructors.
AIR:
The freefall rule for Category A and B was: if your AFF instructors are not with you, you must pull immediately. This rule changes for Category C and forward. Now that you have demonstrated awareness and stability, your instructors may release you during the freefall. The new rule is: if you are Altitude aware, In control, and Relaxed (AIR), you may continue in freefall and deploy at the assigned altitude. However, if you are not Altitude aware, In control, and Relaxed (AIR), you have only 5 seconds to fix it. If unsuccessful after 5 seconds, deploy your main canopy immediately.

Roll out of Bed: Check altitude (left). Arch, and start rollover (center). Neutral body position; check altitude (right).
If you are above your assigned deployment altitude and oriented back-to-earth, roll to one side to recover to a stable, belly-toearth body position. To do so, first check your altitude, relax, arch, and hold it. Look toward the ground either to the right or left
and bring the arm on that side across your chest. As your body rolls that direction and you face the ground, go back to the neutral
body position. Check altitude. This is commonly called the roll-out-of-bed technique. If you are unsuccessful after 5 seconds, deploy your main canopy immediately, even if you are on your back, spinning or tumbling.
IAD and static-line students: After your first successful clear-and-pull jump, you will experience more freefall time by performing two stable 10-second delays. The transition of the relative wind from opposite the aircraft heading to below will be a new experience. Use HAALR to control stability. Add a wave-off prior to deployment, which is a signal to other jumpers that you are getting ready to pull.
New Stuff
Wing Loading and Canopy Size
|
WING LOADING EXAMPLES
|
|
Jumper’s exit weight
|
215
|
215
|
|
Divided by canopy size (sq ft)
|
280
|
195
|
|
Wing loading
|
.77:1
|
1.1:1
|
The wing-loading ratio is the jumper’s exit weight (geared up) divided by the square footage of the canopy. Canopy manufacturers publish wing-loading recommendations for each model of canopy in their owner’s manuals and often on their websites. Take the time now to calculate your wing loading for the canopy you are about to jump next.
Wing loading affects the performance and speed of your canopy. With higher wing loadings, expect faster forward speeds and descent rates, quicker turns, steeper and longer dives from turns, and more violent malfunctions. Canopies at higher wing loadings require more skill to flare correctly. With lighter wing loadings, expect less drive against a strong wind, slower turns, and more forgiveness of landing errors.
Turbulence on Landing
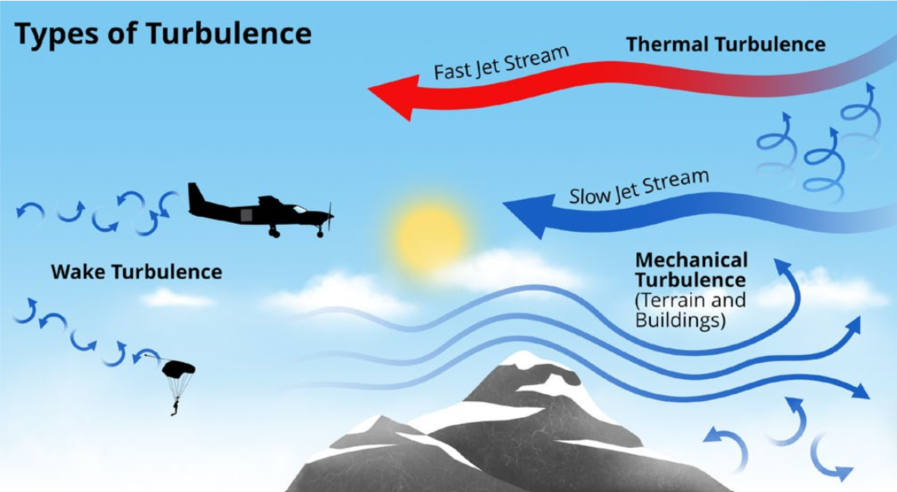
Turbulence is disturbed air that can affect canopy flight and integrity. Due to obstacles and wind direction, turbulence sometimes occurs in the landing area. Understanding and predicting turbulence will allow you to make safe landing choices. Managing unexpected turbulence on landing is an important skill, but avoiding a landing in turbulence is the best plan for safe landings.

Types of Turbulence
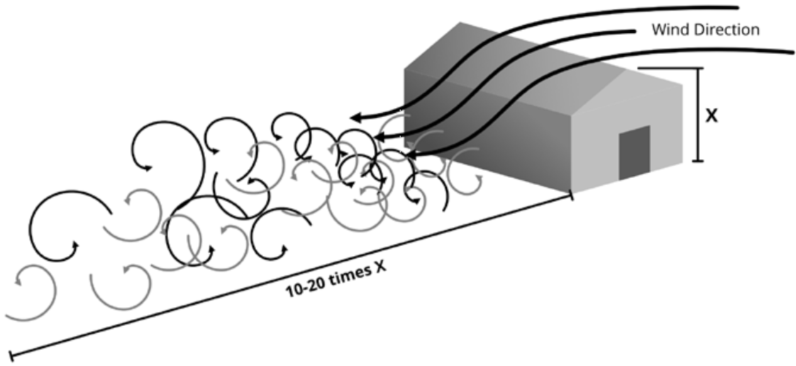
Anticipate turbulence 10-20 times the height of an obstacle on its downwind side. The effects and likelihood of turbulence increase with the surface-wind speed.
Other types of turbulence often occur near runways, alongside roads, behind other canopies, over irregular terrain, and anywhere the color of the ground changes. You can even find it downwind of the propeller wash of a taxiing aircraft.
When flying in turbulence at any altitude, maintain the desired heading using smooth but effective toggle input. Fly in full flight unless the canopy’s owner’s manual directs otherwise. If there is turbulence near the ground, prepare to respond quickly with a forceful flare and a PLF.

Mechanical Turbulence: Anticipate turbulence 10 to 20 times the height of an obstacle on its downwind side.
Turbulence can create a flight cycle. Category B introduced the concept of the flight cycle to reinforce that flaring a parachute is a one-way street, meaning you can always stop pulling down the toggles at any point during the flare stroke, but cannot go back up. A flight cycle is the parachute’s response during the period of time between any input and the parachute’s return to stabilized full flight.
Turbulent or gusty winds on landing can also initiate a flight cycle, causing your parachute to dive toward the ground. If this happens just before the flare, the effectiveness of the flare diminishes. Because the flight cycle will cause you to swing back from underneath the parachute as it dives and picks up speed, you must flare forcefully to get back under the parachute and in a position for landing. To help you recognize a flight cycle and respond effectively, you will perform a flight-cycle drill in this category and practice a forceful flare when in a flight cycle.
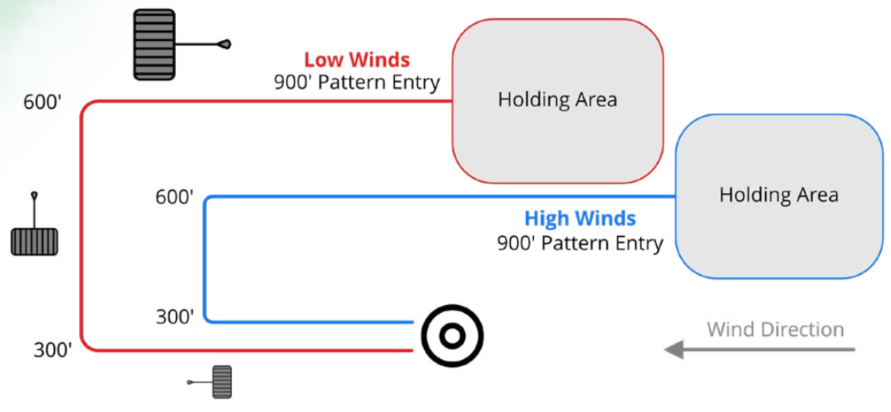
Comparing High-Wind to Low-Wind Landing Patterns

The location of each point and the shape of your landing pattern will vary based on the strength of the wind.
In lighter winds, your pattern will resemble a square, with the downwind leg, base leg, and final-approach leg being of similar length. Make sure you have plenty of clear space past the target in case you overshoot.
In stronger winds, the final-approach and base legs become shorter, and the downwind leg becomes longer. Turn over a clear area during your base leg and final approach in case you land short of the target.
Note: Your USPA Instructor may adjust the shape of the pattern or the checkpoint altitudes or landmarks to account for various conditions.
Improving your Landing
Downwind landings are better than low turns. On calm days, unexpected wind shifts sometimes require you to land with the wind, instead of against it. Sometimes, jumpers become confused about the pattern and don’t realize they are set up for a downwind landing until they’re on final approach. When faced with deciding between a low turn or a downwind landing, apply your landing priorities and choose to land downwind. When making a downwind landing, flare at the normal altitude, regardless of ground speed, and PLF.
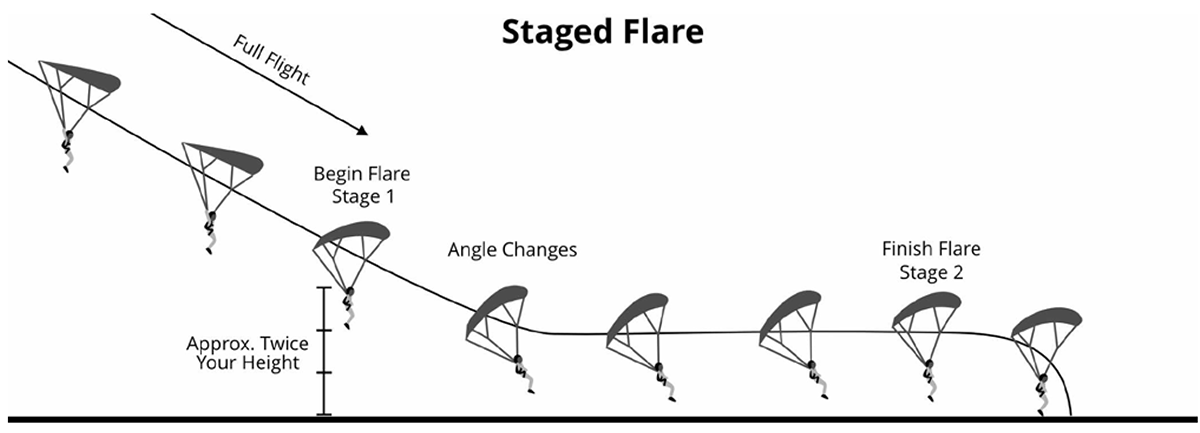
Improving your Flare
Flaring for landing can take a few seconds, so dissecting the parts of the flare can increase your awareness and improve your flare for better landings. During the flare, you are converting forward speed to lift. Flare the canopy quickly to the first stage to slow down and swing under your canopy, flattening the glide. Continue the flare to keep the flat glide. Continue flaring smoothly and completely until landing.

IAD and static-line students: review procedures for deployment handle problems, premature container opening in freefall
(hand deployment), and pilot-chute hesitations before making any jump in Category C.
For Review
To prevent an open parachute in the aircraft, take care when you’re leaning back against anything. Move carefully when you’re near or outside the door. If a parachute opens in the plane and the door is closed, secure the parachute, notify your instructor and land with the plane. If the door is open, contain the parachute, close the door, and land with the plane. If the parachute goes out the door, follow immediately to prevent endangering yourself and others. A pre-jump gear check shortly before leaving the aircraft is essential to prevent these occurrences.
Review Pull Priorities:

If you see your instructor pull, you should pull.
If landing off the DZ is unavoidable, look for an open, clear, accessible field as early as possible. Decide on an alternate landing area by 2,000 feet. Be aware that power lines often run along roads and between buildings, as well as randomly in open fields. A row of vegetation often hides a fence. Rocks, hills, and other terrain irregularities often remain invisible until just prior to touchdown. Inspect an unfamiliar landing area more closely at every 500-foot interval during descent and continuously below 500 feet. Fly a predictable landing pattern and attempt to land clear of turbulence and obstacles. Prepare for a PLF.
Be polite to property owners. Cross only at gates or reinforced areas and leave all gates as they were found. Do not disturb cattle. Walk parallel to and between any rows of crops until reaching the end of the field. Repair or replace any damaged property. If possible, contact the drop zone to give them your status and location.
Some skydiving schools are subject to state and local rules or restrictions concerning landing off. Your instructor will explain anything that pertains to you and your drop zone.
Review Landing Priorities

If landing in high winds, pull in one toggle and steering line to assist in collapsing the canopy, especially if the canopy is dragging you. Cut away the canopy as a last resort or if you’re injured.
New Stuff
IAD and static-line students: Previously, in Categories A and B, if you needed to exit the plane in an aircraft emergency, you used your reserve. The new rule for Category C and forward is: if you are above 3,000 feet, you can use your main canopy if exiting the plane in an aircraft emergency.
New Stuff
The automatic activation device—which you wear only as a backup—initiates reserve deployment when certain parameters are met. Detailed AAD operation is explained in Category D.
Observe the instructor performing the pre-flight check, that is, the equipment check that happens before you put your gear on.
Back: top to bottom—
- reserve pin in place and straight
- reserve closing loop must have no visible wear
- reserve ripcord cable movement in housing
- reserve packing data card and seal
- AAD on
- main activation cable or pin in place, free of nicks or kinks
- main closing loop not worn, near perfect
- pilot-chute-bridle routing or ripcord-cable movement
- main activation handle in place
Front: top to bottom—
- three-ring release system
- RSL connection and routing
- chest strap and hardware intact
- cutaway handle in position
- reserve handle in position
- leg straps and hardware operational and correctly threaded
As a student, you have certain mandatory gear requirements (BSR, Chapter 2-1.M.2-5 ).
The Federal Aviation Administration regulates the training and certification of the FAA rigger (FAR 65).
Your reserve parachute must have been packed by a certificated FAA rigger within the last 180 days. Your main parachute must have been packed within the last 180 days, as well, and can be packed by a rigger, someone under the supervision of a rigger, or the person jumping it (FAR 105.43).