The Flat Track
Before beginning to jump with others, you need to learn to generate horizontal speed with minimal altitude loss, a skill called “tracking.” This skill allows you to create separation from others before opening your parachute. You will perform a flat track, maintaining heading within 30 degrees. Focus on heading first, then pitch; speed will come with practice.
First, locate a point on the horizon to establish your heading. Smoothly and fully extend both legs with your toes pointed to initiate forward motion, and steer to maintain heading. Roll your shoulders and flatten your arch to control your pitch. Fully extend your arms to the side, pressing them down level with your hips. Once you can control your heading and pitch, you can speed up your track by extending your legs more quickly and sweeping your arms back slightly.
Stop your track by passing through neutral, extending your arms forward and down slightly. Return to neutral.
Practice entering and refining an on-heading 5-second track, turning 180 degrees after each attempt and repeating as altitude permits. Exit from aposition facing up the line of flight, such as a floater exit. Turn 90 degrees to start tracking perpendicularly to the line of flight. This allows you to avoid those who exited before or after you, up and down the line of flight. Always plan tracking dives with other groups in mind.
Clear-and-Pull
IAD and static-line students: You have already met the clear-and-pull requirement in Category C.
AFF students: You will perform a clear-and-pull jump from 5,500 feet and, once successful, another from 3,500 feet. A clear-and-pull is used during emergency exits and pre-planned low-altitude jumps. You may want to practice the clear-and-pull on full-altitude jumps by doing a practice throw right after exit, then continuing your planned freefall.
On the clear-and-pull, use a familiar, stable exit technique. To deploy within 5 seconds of exit, present your hips to the relative wind and execute normal pull procedures without the wave-off. Expect the parachute to open in relation to the relative wind, not overhead as usual.
Knowing how your canopy flies in different modes of flight can be useful for adjusting your descent. For example, flying in half brakes before you enter the pattern can help you stay a safe vertical distance from other canopies. Flying your downwind leg in half brakes can flatten your glide to conserve altitude in case you find yourself lower than planned. When flying in brakes, expect a different a glide path than what you normally experience.
CEP—Braked Turns
Braked turns are one of the most important canopy-flight emergency procedures (CEPs) you can practice. Using braked turns, also called “flat turns,” you can change direction under canopy while losing as little altitude as possible. A braked turn also slows your forward speed while maintaining a stable, level wing. If you find yourself landing in a tight or unfamiliar landing area and you must turn to avoid an obstacle at a low altitude, you can use a braked turn. In this emergency situation, executing a braked turn instead of a turn from full flight allows you to change heading and still honor the first landing priority: landing with a level wing.
Start by pulling both toggles down evenly to the half-braked position and hold for a few seconds. Push one toggle down slightly to initiate a 90-degree turn. Practice changing heading as quickly as possible while keeping the wing level. You will practice 90-degree braked turns in this category, but you may need only a 45-degree turn or less, followed by a braked flare, to avoid an obstacle on landing.
CEP—Half-Braked Flares
Practicing braked flares can help you discover the effectiveness of the flare when finishing from a braked position. This CEP is useful in several situations, including when you initially flare too high and need to hold in brakes for a few seconds before finishing; after you use a braked turn to avoid an obstacle on landing; or when you turn too close to the ground.
First, for reference, start by performing a flare from full flight using your normal landing technique. Note the pitch change of your parachute and your swing forward under the parachute at the bottom of your flare stroke. Start a half-braked flare by pulling the toggles to a half-braked position and hold for a few seconds. Then, from that position, flare more quickly and forcefully than you would for your normal flare stroke. Compare the flares you just practiced, especially the parachute’s pitch change and your swing forward. Practice another braked flare, adjusting the speed and force to most closely match the effect of your flare from full flight. Braked flares generally need to be faster and more forceful than a flare from full flight to get an equivalent response.
Accuracy
Review and build on refining your accuracy by continuing to monitor adjusts to your pattern checkpoints as explained in Category E. However, improving your accuracy starts even before you enter the pattern. While you are in the holding area, perform an upper wind check by facing back into the wind and watching your ground track, watching for unexpected wind conditions. Adjust the direction you are facing with different angles to interpret what the winds are doing at that altitude. Use this in-flight information in your decision-making as you aim for your pattern entry point.
You must accumulate two unassisted landings within 82 feet (25 meters) of the planned target.
Explain to your coach or instructor the procedure for an emergency power-line landing. Power lines are difficult to see under canopy, but you can expect them along roads, between buildings, and in clearcut passages for utilities in the forest.
Packing Your Main
You will pack at least one parachute with assistance. Remember the most important points of packing: the lines are straight and in place in the center of the completed pack job, the slider is quartered and at the slider stops at the top of the lines, and the line stows are tight to prevent premature line deployment.
Pre-Jump Equipment Check
You will perform a pre-jump equipment check on another jumper who is in full gear, applying the principles you learned in Category D.
“Check of threes” in the front
- three-ring assembly and reserve static line (three rings)
- three points of harness attachment for snap assembly and correct routing, adjustment, and stowing of excess (three straps)
- three operation handles—main activation, cutaway, reserve (three handles)
Pin check back of system, top to bottom:
- AAD on and set to correct mode
- reserve pin in place; cable moves freely
- main pin in place
Also check personal equipment (“SHAGG”)
Shoes—tied, no hooks
Helmet—fit and adjustment and buckled
Altimeter—set to zero
Goggles—tight and clean
Gloves—lightweight and proper size (below 40 degrees F)
Having supplementary oxygen available on the aircraft is mandatory for skydives made from higher than 15,000 feet MSL (Chapter 2-1.N)
Aircraft Weight and Balance
An aircraft needs to maintain proper weight and balance for the pilot to be able to control its flight. Each aircraft has a specified maximum weight it can carry, and that weight must be distributed properly for it to be in balance. Jumpers moving around the aircraft improperly can place the load out of balance. For example, in aircraft with a door in the rear, some jumpers must remain forward as groups congregate near the door. Large groups planning to exit together should inform the pilot. Your instructor or pilot will answer any specific questions you may have about the aircraft your drop zone flies.
Winds on Jump Run
Winds at altitude can affect jump run. Airspeed is the speed the aircraft is flying. Flying into or with the wind can change its ground speed, that is, the speed it is traveling across the ground. Subtract the speed of the headwind on jump run from the airspeed of the aircraft to determine the ground speed.
There is also a consideration called forward throw. Jumpers first get thrown forward on exit approximately 0.2 miles in calm winds, less with headwind, from residual aircraft speed before they fall straight down.
Exit Separation
Slower-falling jumpers and groups are exposed to upper headwinds longer and are blown farther downwind than faster-falling jumpers and groups. Slower-falling groups should exit before faster-falling groups if jump run is flying into the wind.
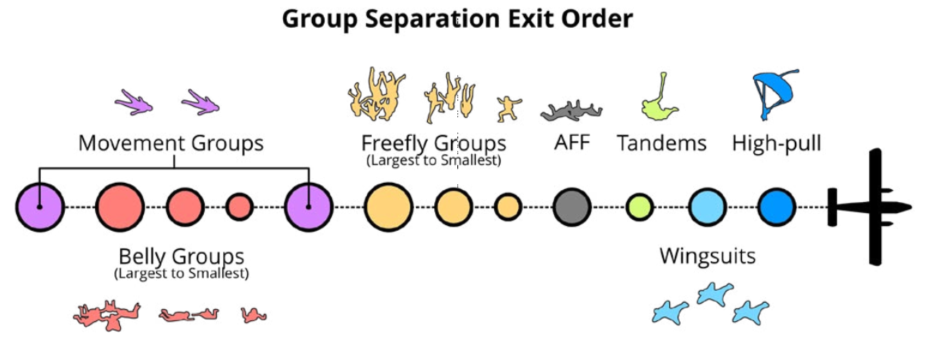
As upper winds get stronger and group sizes get larger, more time between groups is necessary for them to get sufficient horizontal separation over the ground. Provide at least 1,000 feet of ground separation between individuals jumping solo. Provide at least 1,500 feet of ground separation between small groups, adding more as the size of the groups increase.
Many drop zones post in the aircraft a chart of calculated separation times based on the aircraft’s ground speed.
|
Aircraft Ground Speed (knots)
|
Time in seconds for 1,000’ separation between individuals
|
Time in seconds for 1,500’ separation between groups
|
|
115
|
5
|
8
|
|
110
|
6
|
8
|
|
105
|
6
|
8
|
|
100
|
6
|
9
|
|
95
|
7
|
9
|
|
90
|
7
|
10
|
|
85
|
7
|
11
|
|
80
|
8
|
11
|
|
75
|
8
|
12
|
|
70
|
9
|
13
|
|
65
|
10
|
14
|
|
60
|
10
|
15
|
|
55
|
11
|
16
|
|
50
|
12
|
18
|
Once your parachute has opened, fly perpendicularly to the line of flight to promote more separation under canopy from the groups that exited before and after you.