Group Exits
You will practice for an efficient group exit using the same key elements you have used for your solo exits: setup, launch, and flyaway.
In the setup, each jumper in a group has an assigned exit position and should know that position before climb-out. This exit position should include specific foot and hand placement to support presentation of hips into the relative wind during the launch and flyaway. You can exit in a group with or without grips on other jumpers. If you are making a gripped exit, presentation to the relative wind in a neutral body position is the largest contributor to success.
To coordinate the launch, one person in the group will give the count. The movements of the count should be pronounced and given with a smooth cadence so that all jumpers can follow it and leave at the right time. Launch using a neutral body position, presenting to the relative wind.
During the flyaway, maintain eye contact across the center of the group. Looking toward the center of the group will keep you close to the others and support a stable flyaway, preventing the exit from funneling.
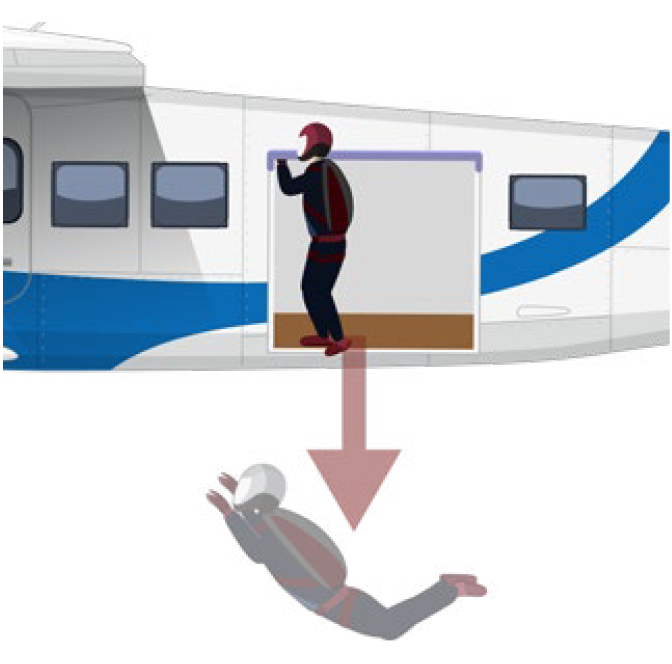
Front Float Exit: Setup and Launch
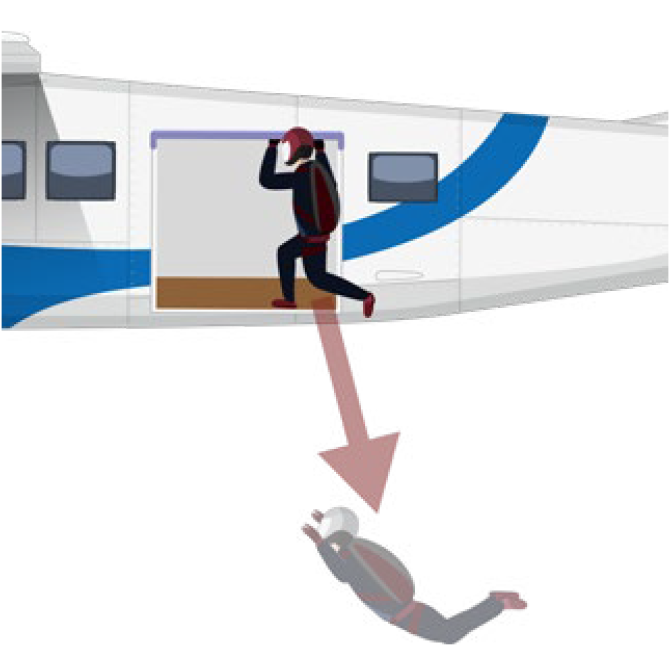
Rear Float Exit: Setup and Launch
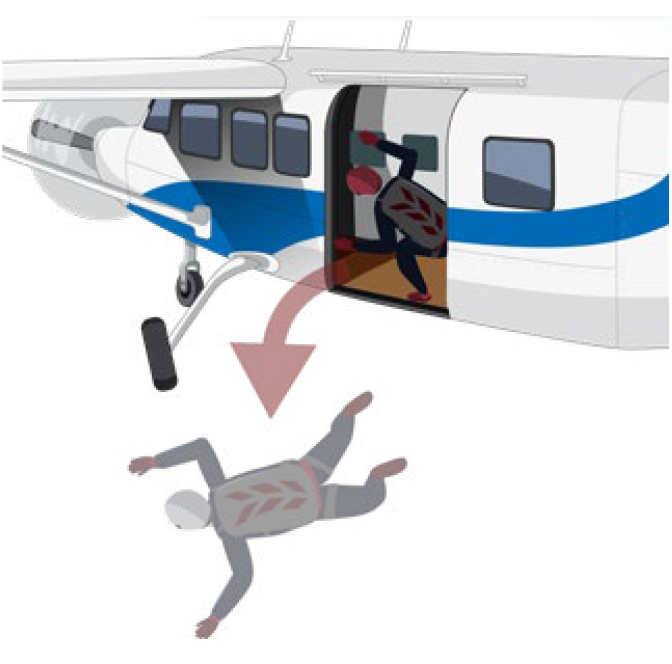
Diving Exit: Setup and Launch
Forward Movement to Dock
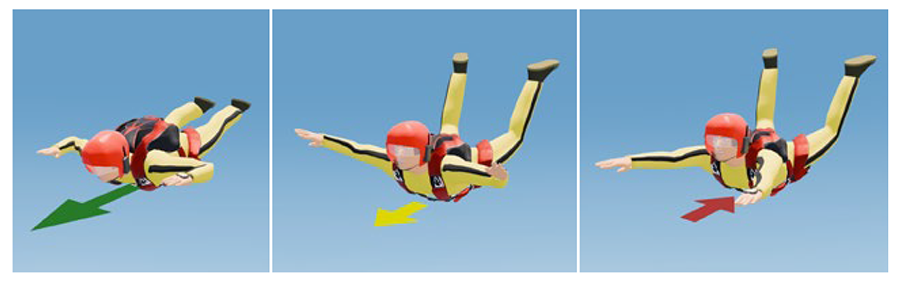
Just as you did for turns in Category D, you will use the concept of start-coast-stop when performing forward movement.
Start forward movement by extending both legs. This will tilt you slightly head-low and initiate forward movement. Use your legs for forward movement, keeping your arms neutral. Maintain your heading by steering with your arms or legs.
Coast by returning to neutral before your desired stopping point. Your momentum from the start movement will continue to carry you forward while you are in neutral, much like your car continues to move forward after removing your foot from the accelerator. During the coast phase, assess your speed and distance to your target to determine when you should begin your stop movement.
Stop by briefly extending both arms and pushing down slightly, which produces backward movement. Keep your legs neutral during the stop. Fly on level all the way to the grips. If you stop prematurely, extend your legs slightly to take the grip.
“Docking” is the term for taking grips, which you’ll do on your coach at the end of your forward movement. Take the grip on your coach’s wrist. Check that your elbows are back to neutral after your stop movement. Extend your feet slightly to maintain positive pressure and counter any tension you feel in the grips, and check altitude. Once you feel no tension, you can loosen your grips and open your palms.
Levels
When jumping with others, you need to get level with the formation prior to docking. Getting level before docking allows for a smooth approach and prevents vertical collisions with other jumpers. You will practice getting level by going up or down relative to your coach.
Just as with turns and forward movement, use start-coast-stop to control your level relative to your coach. Start your movement with the appropriate body position indicated below, coast by going back to neutral, and, if needed, stop by applying movement in the opposite direction.
To start downward movement, temporarily increase your vertical freefall speed by pushing your hips forward, raising your chin, and lifting your shoulders and knees to spill air.
To start upward movement, temporarily decrease your vertical freefall speed by rounding your spine, widening and dropping your knees, cupping your shoulders and chest, and extending your arms and pushing down slightly. Your legs will remain neutral.
When jumping with others, you will likely have to combine the skills of moving up or down with moving forward to dock. First, make sure you are on level, move forward into your position, which is called your “slot,” then take your dock.
Breakoff
Breaking off is the term for tracking away from other jumpers in your group to create horizontal separation before pulling. This assures you have clear airspace when you open your canopy, avoiding a collision with another jumper.
Breakoff occurs at a pre-planned altitude on every skydive. This should be at least 1,500 feet above the planned deployment altitude. At the breakoff, turn 180 degrees from the center of the group, track away, stop, and deploy. It should take approximately 8 seconds from the time you turn and start your track to the time you stop and pull.
Wave off and deploy at the planned altitude whether or not you have turned and tracked. Follow your pull priorities. You are always responsible to breakoff and open at the planned altitude on jumps both with your coach and with others once you get your license.
Adjusting Glide Path
Extending the glide of your canopy allows you to cover a greater distance than full flight. This is important when you are coming back from a long spot.
You can use your brakes or rear risers to extend your glide. Many other variables, such as wind strength, wind direction, and canopy design and size, also affect your glide path. In this category, you will practice using your toggles to extend your glide path. You will learn more about using your rear risers in your B-license canopy proficiency training.
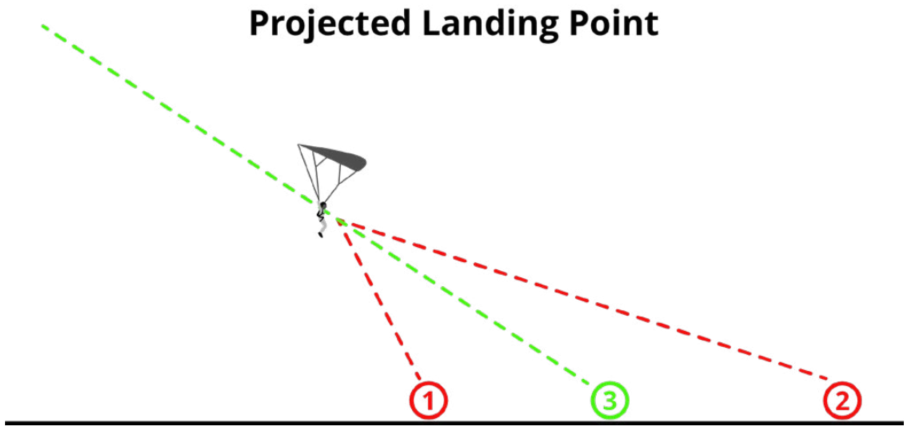
To find your projected landing point:
Pick a point in front of you on the ground and fly toward it.
- If that point falls relative to the horizon or appears to move closer to you, you will fly past this point. You will overshoot this point.
- If that point rises relative to the horizon or appears to move farther from you, you will not make it there. You will undershoot this point.
- If the point stays stationary, this is your project landing point. You will land there.
To adjust your glide path:
Find your projected landing point in full flight. Then pull the toggles down slightly and find the new projected landing point for your new glide path. If the new projected landing point rises or appears to move farther relative to the original projected landing point then your glide path has flattened, and the canopy will cover more distance. If not, your glide path is steeper, and the canopy will cover less distance.
CEP—Turn Reversals with Max Rate of Turn
A turn reversal is when you make a toggle turn in one direction then immediately in the opposite direction, with the goal of maintaining line tension and stability under the canopy throughout the turns. Turn reversal is another canopy-flight emergency procedure (CEP) used for collision avoidance during canopy flight.
Unexpected line twists can occur if you switch too aggressively or rapidly between left and right toggle inputs. Practicing turn reversals will help you discover how far and how fast you can do so without creating line twists. Knowing your maximum safe rate of turn can help you avoid line twists when reacting to avoid an imminent canopy collision. A canopy collision can happen anytime during a canopy descent or in the landing pattern. The potential for collision with other jumpers increases when in the holding area and pattern because other jumpers may be focused more on the target than on traffic. Line twists at landing-pattern altitude may be unrecoverable in time for a safe landing, particularly with a higher wing loading. For these reasons, you must practice all turn reversals above your decision altitude, just in case you induce a line twist.
To practice turn reversals, make a smooth but deep turn at least 90 degrees to the left, then reverse toggle positions smoothly but quickly for a 180-degree turn to the right. Enter a turn only as quickly as the canopy can maintain balance and line tension during the turn. Surging, lurching, or line twists indicate a turn entered too quickly. The canopy dives sharply after a maximum-performance turn.
Accuracy
To improve your accuracy:
-
Plan your pattern checkpoints for the day’s conditions
-
Precisely execute your plan on the jump (The precision of digital altimeters
provides excellent feedback.)
-
Assess your accuracy using tools like Google maps measure-distance tool
- Adjust for the next jump as described in Category E
You will accumulate two unassisted landings within 65 feet (20 meters) of a planned
target. Remember, you need five total to complete the requirements for your A license.
CEP for Canopy Collision Avoidance – Rear-Riser Steering
Know where other nearby jumpers are during opening and steer with the back risers to avoid them. If a head-on collision is pending, both jumpers should turn right. For expanded collision-avoidance training, look up the USPA-recommended procedures in Chapter 4-1.
Tree-Landing Avoidance
As a review, your coach or instructor will ask you to describe the tree-landing emergency procedure that you learned in the Category A first-jump course.
By the end of this category, you should be able to pack at least one main parachute without assistance.
Inspecting Gear
You should be able to inspect your gear to identify areas susceptible to high wear. If you find items requiring maintenance, you should alert your coach or instructor. Many of these items must be addressed only by an FAA rigger.
pilot chute, bridle, and deployment handle
- Look for broken stitching around the apex and the seam where the pilot chute’s fabric and mesh meet.
- Check for security at the bridle’s attachment point.
- Look for damage to the fabric and mesh.
deployment bag
- Look for distortion in the grommets, especially at the bridle, and fabric damage around their edges.
- Check the loops that hold the line-stow rubber bands.
closing pin
- Check for nicks or corrosion on the pin.
pilot-chute attachment
- Look for wear where the bridle attaches to the canopy.
- Look for broken stitching on the canopy itself where it is reinforced for the bridle-attachment loop or ring.
parachute fabric
- Check for small holes on the top skin where the bridle attaches to the parachute
- Look for wear on the top skin and end cells caused by contact with sharp objects or corrosive materials.
- Look for wear in and around the reinforcements in the stabilizers that contain the slider stops.
- Look for broken or missing stitching along the seams.
slider
- Inspect for nicks or sharp edges in the slider grommets and fabric pulling out of the grommets.
- Look at the fabric for damage.
lines
- Look for wear anywhere along the lines, but especially where the slider grommets contact metal connector links.
- Look for signs of line shrinkage that cause unequal lengths.
slider bumpers and links
- Look for damage to slider bumpers
- Check that the slider bumpers are tight on the link or secured with tack cord to prevent them from sliding up the lines and stopping the slider.
- Check accessible links for nicks and sharp edges. Ensure they are closed and tightened.
- Check soft links for wear.
brake system
- Look for wear on the lower steering lines.
- Examine the toggle locking loops on the brake lines for damage and wear.
- Inspect toggle keepers and brake-line-excess keepers.
- Ensure that the toggle keepers hold the toggles securely.
three-ring release system
- Look for wear in the loops holding the rings and the white retaining loop.
- Check the cutaway-cable housings for wear or damage and broken or loose tacking.
- Look for kinks in the cutaway cable where it contacts the white retaining loop.
- Check the front and back of the riser webbing for fraying or warping around the edges of the grommets.
- Check that riser-housing inserts are secure and excess cutaway cable is stowed in the riser housing.
riser covers
- Confirm tuck tabs fit properly and stay in their pockets.
- Check that the stiffener in the tuck tab is not cracked or bent.
main-container closing grommets
- Inspect for distortion, sharp edges or nicks, and fabric damage around the edges.
- Check for severe distortion or breakage of the plastic stiffener inside the fabric where the grommet is set.
main- and reserve-pin covers
- Check the plastic stiffeners for distortion.
reserve loop and pin
- Check that there is no fraying of the reserve loop.
- Check that the thread on the seal is not broken.
- Look at the condition of the reserve pin and grommet.
Store your parachute in a cool, dry, dark place. In the summer, cars are too hot for safe prolonged storage since heat weakens AAD batteries and rubber bands. The sun’s ultraviolet rays degrade nylon. Moisture corrodes hardware, which is very dangerous, since rust degrades nylon. Moisture also promotes mildew, which is harmful to nylon. Many chemicals and acids damage parachute materials.
Only an FAA Senior or Master Rigger may maintain and repair a parachute system, but only an FAA Master Rigger may make major repairs and alterations. (FAR 65.125)
AADs, if installed, must be maintained according to the manufacturer’s instructions (FAR 105.43.c).
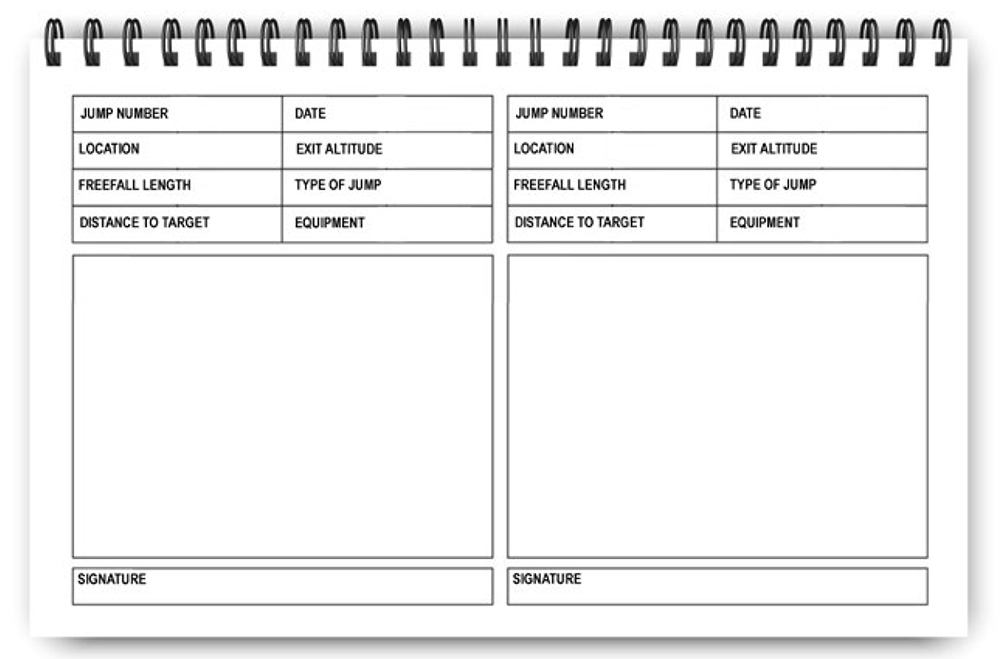
Filling out your logbook:
Use guidance from Chapter 3-1 to correctly record your jumps. You can
use paper or digital devices, as long as the required information is listed and verified with a proper
signature.
Weather Conditions
Refer to the information on weather in Chapter 4-5, Recommendations for Everyone. Some weather conditions can be hazardous for skydivers, but there are many practical methods of observing weather and obtaining forecasts that can help you avoid these hazards. In this category, you will perform all spotting procedures with assistance in routine weather conditions.