The topics appear here in chronological order; however, your school’s first-jump course may teach them in a different order. Unless otherwise indicated at the beginning of a section, a current USPA Coach under the supervision of any USPA Instructor may teach the first-jump course.
Your equipment will consist of a harness-and-container system, commonly referred to as "a rig," which contains a main parachute and a reserve parachute. The rig will have three handles: a main deployment handle to open your main parachute, a cutaway handle to release the main parachute in an emergency, and a reserve handle to deploy your reserve parachute. Your main parachute is divided into a series of cells that trap air. You will be suspended under the canopy by a set of suspension lines that attach to risers, which are connected to the harness-and-container system. There are also two toggles, which are attached to steering lines, that you'll use to steer the canopy.
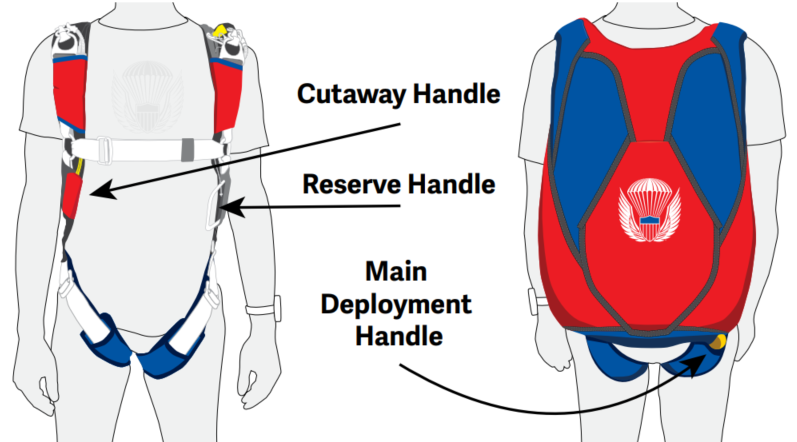
Basics of a Rig: Locations of primary points on a skydiver’s rig.
A parachute opens in three stages:
- Activation—by throwing the pilot chute, by pulling the ripcord, or by static line
- Deployment—the parachute comes out of the container
- Inflation—the parachute fills with air
Your rig also includes two important safety devices. The reserve static line is a connection between the main parachute risers and the reserve pin that activates your reserve parachute when you release a malfunctioning main parachute. The automatic activation device initiates deployment of your reserve parachute at a pre-set altitude and speed. Both are only back-up devices. It is always your job to pull the handles in case of a malfunction.
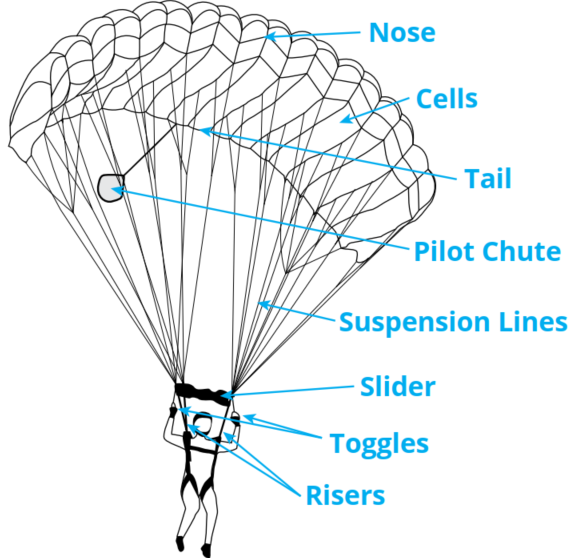
Parachute: Familiarize yourself with the names and parts as illustrated
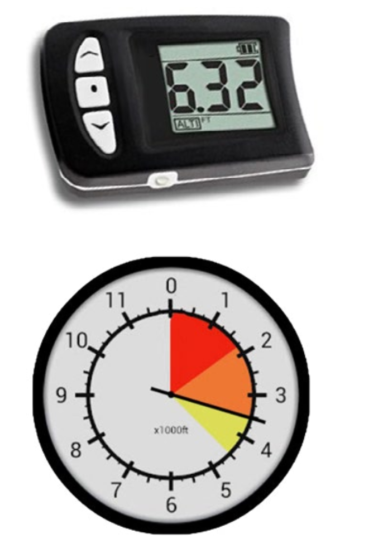
Visual Altimeters: digital (top) and analog (bottom)
You will also be equipped with an altimeter, which indicates your approximate altitude in thousands of feet above the ground. Handle it with care. Altitude awareness is your most important task until you open your parachute. You also use your altimeter throughout your canopy flight.
In freefall, you should check your altitude:
- every three seconds
- after each maneuver
- whenever you encounter something unexpected
In Category A, the USPA Instructor takes responsibility for putting your equipment on you, adjusting it correctly, and checking it:
- before you put it on
- immediately after you put it on
- before boarding the plane
- in the aircraft shortly before exit
Your instructor must accompany you anytime you approach, enter, and move about the aircraft, whether the engine is running or not. Always approach fixed-wing aircraft from the rear to avoid contact with the propeller. Protect your gear by being mindful of the parachute rig on your back when climbing into and moving about the aircraft. According to Federal Aviation Regulations (FARs), the pilot and the jumper are jointly responsible for ensuring that the jumper wears seat belts or restraints during taxi, takeoff, and landing.
Aircraft Emergencies
A USPA Coach, under the supervision of a USPA Instructor, may teach this section.
The probability of an aircraft emergency is low. In an emergency, your first response is to stay calm and wait for a command from your instructor. The pilot will tell your instructor to either prepare for landing or to exit the plane. Your instructor will tell you which of these actions you need to perform:
- land in the aircraft
- exit and use your reserve parachute
- exit and use your main parachute
- perform a routine exit with or without instructor assistance
If you land with the aircraft in an emergency:
- ensure your helmet and seat belt or restraint are on
- assume a safety position taught by your instructor
- clasp your hands behind your head to reinforce your neck
- after landing, unfasten your seat belt or restraint and immediately exit in an orderly fashion and walk at least 100 feet away from the plane
If you exit the aircraft after an emergency:
- ensure your parachute is open immediately
- look for your instructor’s parachute
- follow them to a clear, open landing area and prepare to perform a parachute landing fall (PLF)
Select any clear area if you can’t find your instructor.
If any parachute opens in the aircraft, attempt to contain the parachute and inform the instructor. If your parachute goes out the door, follow immediately to prevent damage to the plane and injury to yourself or others. If anyone else’s parachute goes out the door, immediately push them to and through the door for the same reason.
A USPA Instructor rated for the method-specific discipline in which you are training must teach this portion.
It’s important to plan your dive, then dive your plan.
Exit
A good exit from the aircraft makes best use of learning time and provides a safer, more controlled experience. There are three parts to an exit:
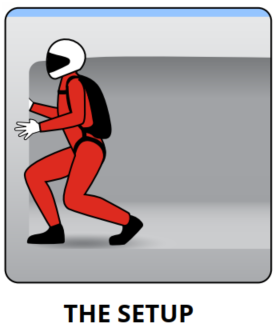
Set yourself up for successby placing your hips, head, feet, and hands in the easiest position to get to the next picture ...
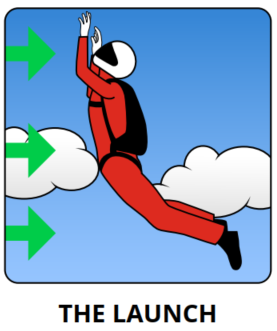
As soon as you leave the plane, launch your hips into the relative wind, keeping your head and eyes up, relaxing as you get to the next picture ...
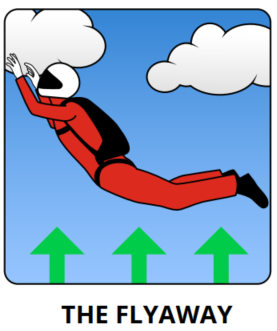
Hold a relaxed arch as you fly away and shift from the relative wind to the terminal wind, a transitional state known as “the hill.”
Set-up procedures prepare you to exit in a stable, belly-first freefall body position. The set-up position should place your belly (pelvis) facing forward into the supporting wind, known as the relative wind. As you exit, you will feel the relative wind coming from the front of the airplane. During the first several seconds of freefall, you will naturally transition to a belly-to earth position and will feel the relative wind supporting you from below. Presenting your belly to the relative wind on exit increases your stability during the exit.
Your set up will vary based on the aircraft from which you are exiting, but your launch and flyaway will be essentially the same, regardless of aircraft. To time the launch, you will either perform a count or respond to a “go” command.
Tandem students: Your instructor will practice with you the exit and exit commands that you will use.
AFF students: Verify that the instructors are ready. Call, “Check in!” to the inside instructor, who responds, “OK!” Call, “Check out!” to the outside instructor, who responds, “OK!” Take a deep breath to relax and then begin a count with a verbal and physical cadence “Up, down, arch!” or “Out, in, arch!” to help the instructors leave simultaneously with you.
IAD and static-line students: Climb into position and wait for the instructor’s command. Look for signals from your instructor. On “Go!” take a breath to relax and look up. Release from the plane, count out loud by thousands to 5,000, then check the parachute.
You must exit soon after climbing out to ensure that you open the parachute over the correct place on the ground.
During the first few seconds after your launch, you will experience what is known as the flyaway—the transition from your vertical position to your belly-to-earth position. This happens naturally when you maintain a relaxed, arched body position with your hips facing the relative wind.
AFF students: In case of instability, check your altitude, arch until the horizon comes flat into view, and follow your instructors’ signals. If you lose one instructor, continue as usual. If you lose both instructors, pull immediately.
Tandem, IAD, and static-line students: In case of instability on exit, arch.
Body Position
You will learn to fall belly first into the relative wind in a neutral, arched body position. An arched body position creates stability and results in a more reliable deployment of the parachute.
Arching and extending the legs slightly while relaxing the rest of the body results in a smooth, on-heading freefall. The key elements of a neutral body position include:
- hips forward with back arched
- knees at shoulder-width apart
- legs extended slightly, knees bent 45 degrees, toes pointed
- upper arms positioned 90 degrees or less from the torso and relaxed
- elbows bent 90-120 degrees and relaxed
- chin up
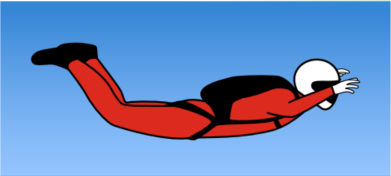 Neutral Body Position
You will practice this body position until it becomes more natural. Consciously breathing will help you relax.
Your instructor may use hand signals to correct your body position and to provide dive-flow reminders. You should respond to all adjustments smoothly and slowly and maintain your new body position.
Hand Signals
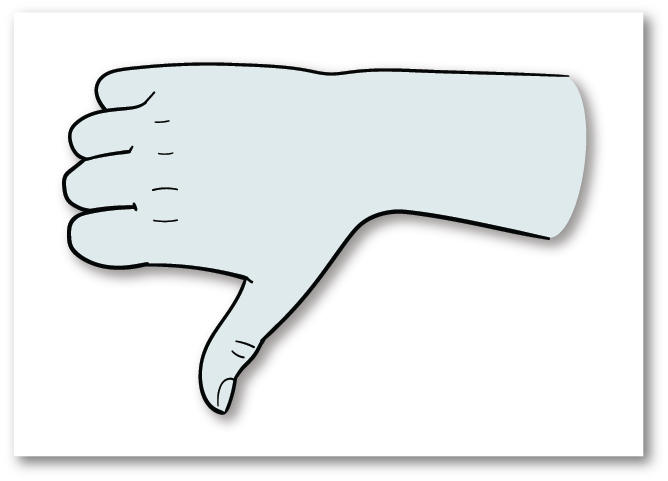
Pelvis Forward (arch)
Circle of Awareness
(altitude check)
OK

Deploy the Parachute (pull)
Legs In (retract legs slightly)
Extend Legs Six Inches and Hold
Open Hand
(release pilot chute)
Check Arm Position
Knees Together
Slightly -or- Toe Taps
Perform the Practice
Deployment Sequence
Relax (breathe)
Freefall-Dive-Flow Skills (AFF)
If you are training via the AFF method or another harness-hold method, a USPA Coach may introduce these skills and the sequence, but a USPA AFF Instructor is responsible for directly supervising practice and ensuring proficiency.
After exiting, take a breath and relax, making sure you are in the correct freefall body position. Then, perform a circle of awareness:
- look at the horizon to check your heading
- read your altimeter
- look first to the reserve-side instructor and then to the main-side instructor for signals
Then, perform three practice deployments:
- practice slowly and deliberately, moving only your arms
- verbalize each action
- pause to feel the deployment handle each time
- check that your body position is correct before, during, and after each practice deployment
Perform a second circle-of-awareness check. Then monitor your altitude and body position for the remainder of the freefall using HAALR:
Heading (look at the horizon)
Altitude (most important)
Arch (hips forward, chin up)
Legs (ensure neutral leg position)
Relax (take a deep breath)
While receiving video of your jump may be of benefit during training, you must pay attention to your altitude not the camera flyer.
At 6,000 feet, lock on to your altimeter and keep looking at it until you see it read 5,500 feet. At 5,500 feet, wave off by waving both arms smoothly overhead, which signals to your instructors that you know your altitude and intend to pull. Remember that the wave off is the beginning of a slow, smooth, pull sequence that will take approximately 1,000 feet from start to finish. Initiate deployment with the wave off, arch, reach, and pull sequence, and deploy your parachute as practiced. The instructor may assist you.
Main Deployment
A USPA Coach can teach this section under the supervision of a USPA Instructor.
Body Position for Deployment
Establish a neutral body position, then locate the main deployment handle. Look up while reaching for your handle and maintain your arch while keeping your spine straight.
For balance, stretch your left hand overhead (like you are raising your hand to ask a question) as you reach with your right hand for the deployment handle. Pull the handle, then return to your neutral body position. Verbalize each action.

Deployment: From a neutral arch, reach back while staying symmetrical, and pull the handle, throwing it briskly. Then, return to a neutral arch.
After you pull, remain flat and stable with your shoulders level throughout the deployment, counting by thousands to 3,000. After the count of three, visually check for pilot-chute and main-canopy deployment.
Pull Priorities

The number-one priority on any skydive is to pull. You can pull at any time during the skydive when encountering difficulty or experiencing something unexpected. The second priority is to pull at the assigned altitude, and the third priority is to preferably pull in a stable body position. A stable, face-to-earth body position improves opening reliability but is less important than opening at the assigned altitude. Always prioritize altitude over stability.
STOP AND CHECK YOURSELF:
What should you do anytime you see your instructor pull? Answer: Pull.
What should you do if you are on your back at pull altitude? Answer: Pull. Pulling at the proper altitude is more important than pulling while stable.
IAD and static-line students: As you exit the plane, remain arched and stable with your feet extended slightly, toes pointed, and shoulders level through deployment, counting to five by thousands. Look over your shoulder for the pilot chute (if used) and main-canopy deployment.
Deployment Problems
If you cannot find the main deployment handle, feel across the bottom of the container to the corner, then down the side to the corner. Attempt to locate it no more than twice or for 5 seconds, whichever comes first. If you cannot find it, initiate emergency procedures.
If you find the main deployment handle but it is stuck, often referred to as a hard pull, attempt to throw the pilot chute no more than twice or for 5 seconds, whichever comes first. If you are unsuccessful, initiate emergency procedures.
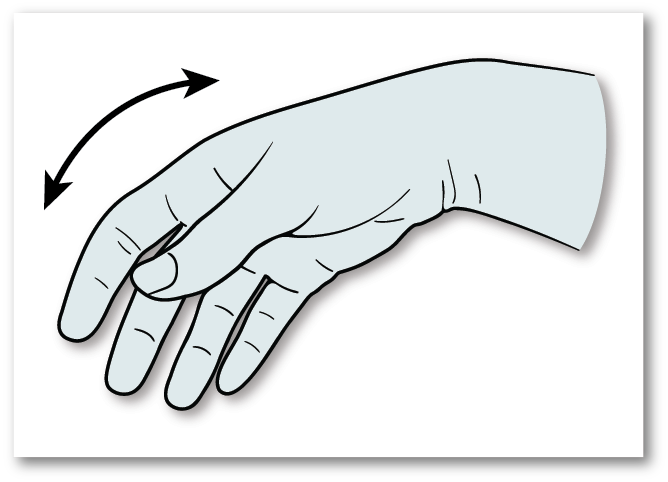
If you throw the pilot chute but it gets stuck in the burble behind your back, clear this pilot-chute hesitation by twisting at the waist and looking over your shoulder to change the airflow. Attempt to clear the pilot chute no more than twice or for 5 seconds, whichever comes first. If the pilot chute does not launch off your back, initiate emergency procedures.
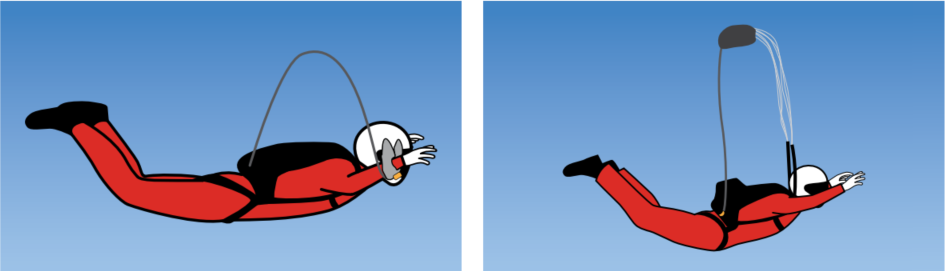
Deployment Problems: Pilot-chute entanglement (left) and premature container opening (right)
If you throw the pilot chute but the bridle wraps around a body part, arch harder for stability and attempt to clear the pilot-chute entanglement by pointing the limb that’s entangled to the sky to shake it off. Attempt this no more than twice or for 5 seconds, whichever comes first. If that fails, initiate emergency procedures.
If your container opens prematurely in freefall, attempt to locate and deploy the pilot chute no more than two times or for 5 seconds, whichever comes first. If you can’t locate the pilot chute after two tries or within five seconds, cut away and deploy the reserve. Alternatively, if you find and throw the pilot chute and it results in a partial malfunction, cut away and deploy the reserve.
IAD and static-line students: If the static line fails to disconnect from the parachute system and you are being towed behind the aircraft, a situation known as student-in-tow, arch and signal to your instructor that you are ready for them to cut your static line. After the static line is cut, deploy your reserve.
IAD students: Ensure that you look over your shoulder once you have exited the plane after counting to 5 seconds. If the pilot chute gets caught on your hand or arm, attempt to clear it twice; if it does not clear, execute your emergency procedures.
Canopy Basics
A canopy is an inflatable wing that performs like the wing of an airplane. Once it is open and inflated, the canopy will start gliding forward and down through the air. The airflow around the canopy creates lift.
With both toggles all the way up, the canopy should glide straight ahead at full speed. To turn, look in the direction you want to turn, then pull that toggle down.
Pulling one toggle down a small amount produces a slow turn with a relatively small amount of dive. Small toggle inputs can be used to make minor heading corrections at any point in the canopy flight. Pulling one toggle down farther will produce a faster turn and cause the canopy to dive. Pulling both toggles down, known as a flare, decreases the rate of descent and forward speed of the canopy.
When flying into the wind, you will fly more slowly across the ground. When flying with the wind, you will move more quickly across the ground. When flying perpendicularly to the wind, known as crabbing, you will move in the direction you are facing with some sideways drift, and these effects will increase as wind speed increases.
Canopy Check
Immediately after deployment, you need to complete a canopy check to see whether you have a good canopy. Common questions used to assess your canopy include: “Is it there? Is it square? Is it steerable?” Or, “Is it square? Is it stable? Is it steerable?” During your first jump course, your instructor will cover what each question means specifically and help you practice applying them to several scenarios. For example:
There? Check the canopy for proper inflation after the deployment. The canopy should be large and fully inflated.
Square? It should have four well-defined edges that create a rectangular shape. The suspension lines should cascade down in four neat line groups to each riser, and the slider should be down to the tops of the risers. The canopy should be stable; it is flying level toward the horizon, not turning or spinning, with only fixable problems left to be solved.
Steerable? You must perform a canopy-control check to ensure the canopy flies straight in full flight, is steerable and can be flared. First, unstow your toggles and confirm the canopy is flying straight. To confirm the parachute will brake properly for landing, flare by pulling both toggles all the way down. Smoothly raise the toggles back up to full flight. To confirm the parachute is steerable, look right, turn right at least 90 degrees, then stop the turn by going back to full flight. Finally, look left, turn left, then stop the turn by going back to full flight.
Decide whether the canopy is controllable and safe to land by 2,500 feet, which is your decision altitude. If it is not, you must immediately initiate emergency procedures.

Emergency Procedures Decision Tree
Fixable Problems
Problems that are usually minor include end cells of the canopy that stay closed, a slider that stays up near the canopy, an unintended turn, line twists, or other issues involving an inflated canopy. Line twists must be fixed first. To untwist the lines, spread the risers and kick, but release the brakes only after clearing the twist. Except for line twists, you can solve most minor problems with a canopy-control check. If the problem continues or gets worse, initiate your emergency procedures by 2,500 feet. If in doubt, initiate your emergency procedures. It is not advisable to try to land a compromised parachute.
Canopy Malfunctions
Your instructor will provide you with practice on the proper procedures for the equipment you will be jumping.
Emergency Procedures
If you have a canopy malfunction, check your altitude to make sure you are above your cutaway hard deck of 1,000 feet, then cut away and pull your reserve. Below 1,000 feet it becomes too low to safely cut away, and you must deploy the reserve and land both parachutes.
Unusual Malfunctions
While most malfunctions require the emergency procedures described above, some require you to perform different actions.
Two Parachutes Out
You can prevent a two-parachutes-out malfunction by staying altitude aware and protecting your handles and closing pins. There are two possible actions you can take in a two-out situation: land both canopies or cut away.
You should land both canopies if you have a stable biplane, a side-by-side, or a main-reserve entanglement. If all toggles are stowed, leave them stowed. If the toggles have been unstowed on one canopy, unstow the toggles on the other. For a biplane, gently steer the front parachute by pulling down gently on the rear riser in the direction you wish to go. For a side-by-side, gently steer the parachute that is more directly overhead, also using the rear risers. Land without flaring and perform a parachute landing fall. In the rare case of a main-reserve entanglement, never give up trying to clear the entanglement or inflate the parachutes. Do your best to make the parachutes fly straight for landing, and perform a PLF.
If you have a downplane, you must cut away regardless of altitude. A downplane occurs when the two parachutes separate and begin flying toward the ground. This is the only exception to the 1,000-foot cutaway hard deck.
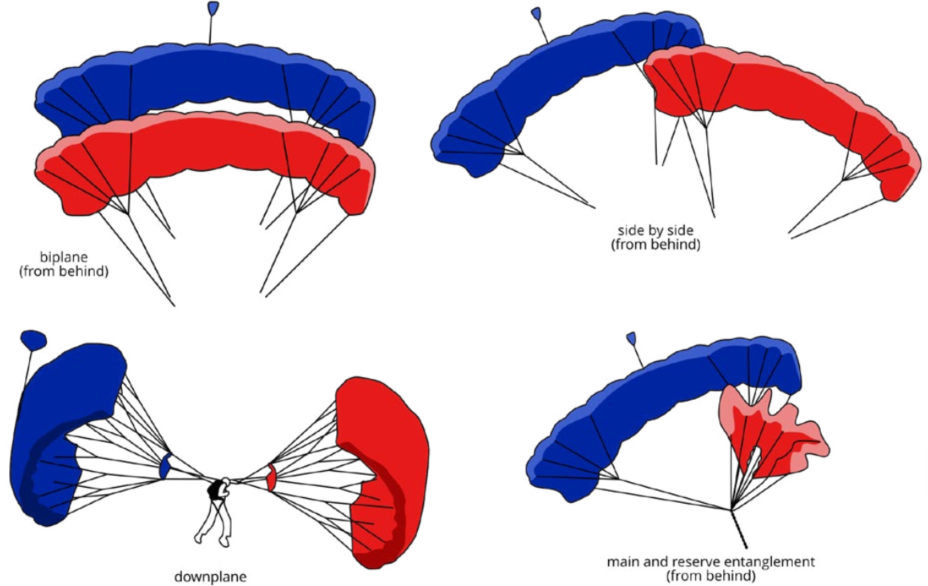
Two-Parachutes-Out Scenarios
Canopy Flight
After making sure you have a good canopy, check your altitude, then observe your position over the ground. Following your canopy inspection, you must locate the airport and the planned holding area. Once you have identified the holding area, fly directly to it. Arriving at the holding area at or above 2,000 feet will set you up to be in the right place to enter your landing pattern.
While you are in canopy flight, regularly check your altitude and position over the ground while working toward your pattern-entry point and watch for other canopy traffic< (APT).
All jumpers must also avoid canopy collisions (i.e., collisions with other jumpers under open parachutes). If a collision is imminent, in most cases both jumpers should steer to the right. If two jumpers collide and entangle, they must communicate their intentions before taking further action. If it is too low for a safe cutaway (below 1,000 feet) and the canopies are uncontrollable, both jumpers should deploy their reserves.
Landing Pattern
Your landing pattern is a deliberate flight path, usually rectangular, that you use during the final phase of descent under canopy. It usually starts at 900 feet at a predetermined pattern-entry point. There are three legs to the pattern: downwind, base, and final. Before each jump, your instructor will determine your landing pattern and review it with you using an aerial map of your drop zone. It’s important to plan your flight, then fly your plan.
The pattern consists of checkpoints at the start of each leg. Each checkpoint consists of an altitude and a landmark. Your downwind leg starts at 900 feet above the ground, base leg at 600 feet, and final approach at 300 feet. For each leg you must turn at your altitude or landmark, whichever comes first.
Note: Your instructor may adjust the shape of the pattern, the altitudes, or the landmarks to account for various conditions or your drop zone’s policies.
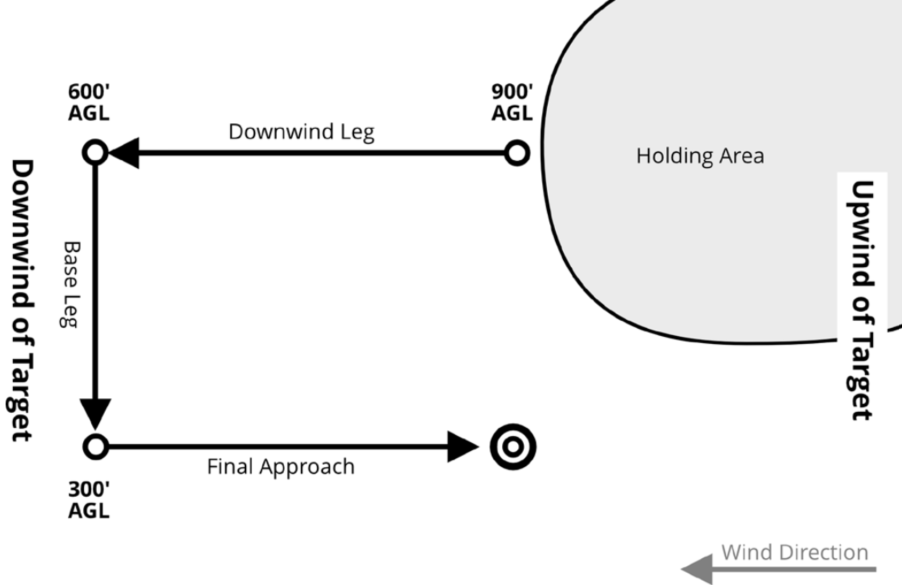
Example Landing Pattern
Final Approach and Landing
Landing Priorities

On final, your main priority is to land with a level wing, while flying straight toward a clear and open area, flaring before touching down and performing a PLF. You may use minimal toggle inputs to avoid obstacles on the ground and give yourself a longer, obstacle-free runway for landing, but you must keep your wing level. If the canopy begins to drift right or left, use the appropriate input to stop the drift and keep the canopy flying straight toward a clear area. The best way to avoid obstacles is to look toward a clear area and guide the canopy there rather than focusing on an obstacle. Landing into the wind is desirable but is not one of your landing priorities.
To slow your forward speed and descent rate, you will flare when your feet are above the ground at approximately twice your height. Prepare to land during the last part of the final approach by putting your feet and knees together in a parachute landing fall (PLF) position. Except for small corrections, keep your toggles all the way up in the full-glide position when on final approach. This will help the canopy produce more lift when you flare. Judge the flare height by looking forward and down at a 45-degree angle.
Note: Your instructor may vary the exact flare technique based on the type of canopy you will be using or other factors.
Think of flaring as driving down a one-way street. You can stop at any point but cannot go back. If you start the flare too high, stop flaring and hold the toggles where they are. Letting the toggles up abruptly causes a steep dive toward the ground, known as a “flight cycle.” (You will learn more about flight cycles in Category B.) Quickly assess your height above the ground. Keep looking ahead and keep the canopy flying straight. When you are closer to the ground, push the toggles forcefully the rest of the way down to finish the flare before touching the ground.
You should be prepared to PLF every time you land. You should only attempt a stand-up landing if you touch down softly and are confident that you can comfortably remain on your feet.
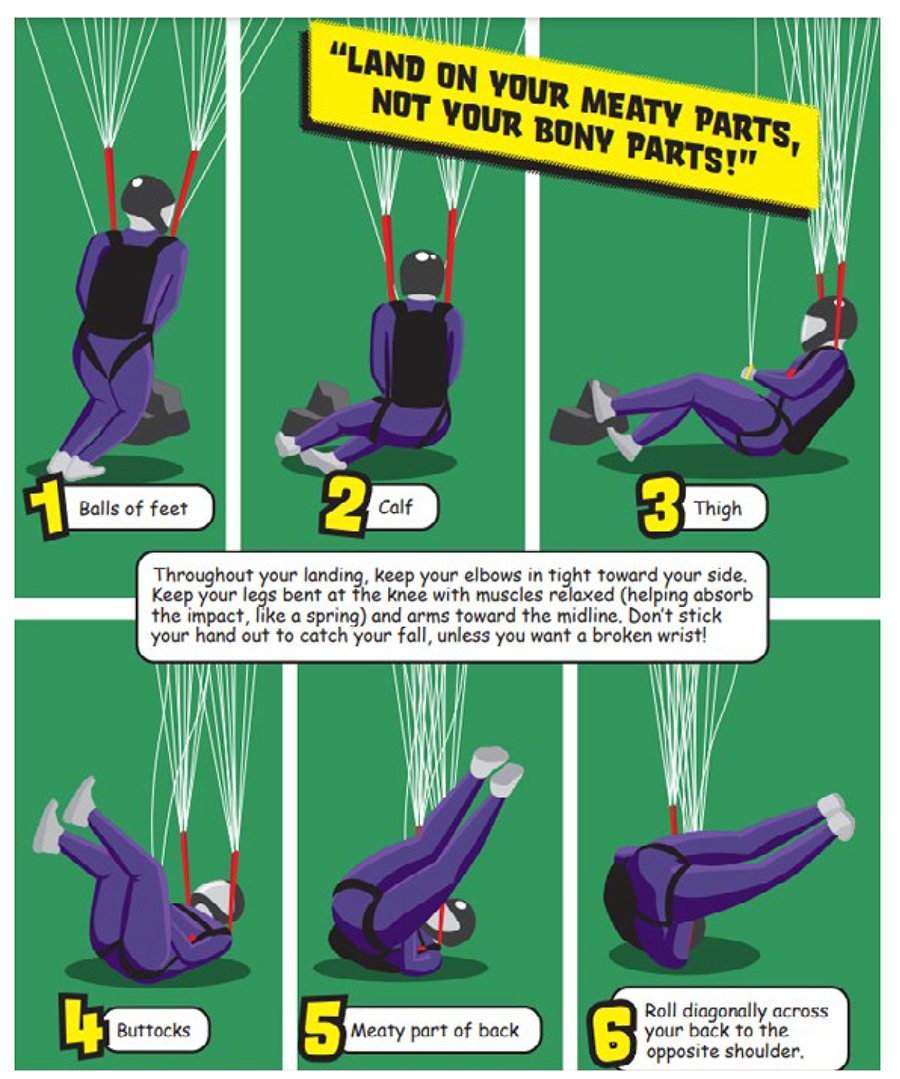
Parachute Landing Fall (PLF)
Performing a PLF can help you reduce the risk of injury during landing by distributing the impact across five points of your body. To prepare for a PLF, press your feet and knees together with your knees slightly bent. Flare completely with both hands together and close to the front of your body to help prevent wrist and hand injuries. Keep your chin to your chest to help prevent neck injuries. Allow your feet to contact the ground first. Maintain the PLF position throughout the entire landing roll.
As the balls of your feet touch the ground:
- Lean into the direction of the landing to roll down one side of the body
- Lay over to the side of one calf
- Continue to roll to the thigh on the same side
- Continue rolling through the small of your back to the opposite shoulder
Allow your body to continue rolling and absorb the energy of the fall
The PLF position is also the proper way to prepare for a stand-up landing as it keeps your weight balanced in the harness and your hands even when the toggles are all the way down in the flare. If you touch down softly, you can step out of the PLF position and remain on your feet.
Landing Problems
Alternate Landing Areas
You should be prepared to make correct decisions and land safely without assistance, whether you land in the intended landing area or an alternate one. If you are not in your holding area or close to it when the canopy opens, be prepared to choose an alternate landing area by 2,000 feet. Maintain altitude awareness while flying back toward your 900-foot pattern-entry point.
At or above 2,000 feet, you should determine whether you will be able to reach your 900-foot pattern-entry point. If it is obvious that the 900-foot point is unreachable, look for your 600-foot and 300-foot points. If you are sure that you will be able to reach one of those points, fly toward it and remain over that point until you reach the correct altitude to begin that leg of your pattern. If it is obvious that you will not reach any point in your pattern by the correct altitude, then plan to land in an open area that is free of obstacles. Keep in mind that your best alternate landing area may be behind you. Choose your new holding area and visually transfer the intended landing pattern to the new landing area.
Landing Off Field
Any time you must land in an alternate area, on or off the airport property, look carefully for obstacles. You can look closely during the downwind leg of the pattern because you are closer to the ground. Avoid the obstacles by looking and steering the canopy toward a clear and open area, avoiding straight lines in the terrain that may indicate power lines, fences, or ditches. PLF and wait for assistance or further instructions. Be polite to property owners. If possible, contact the drop zone to give them your status and location.
Recovering the Canopy in Higher Winds
When you are on the ground, pull in one toggle and steering line to assist in collapsing the canopy, especially if it is dragging you. Cut away the canopy as a last resort or if you’re injured.
Obstacle Landing
Potential obstacles during landing include water, trees, buildings, power lines, fences, and similar hazards. You can usually avoid these obstacles by preparing for the canopy flight by observing the winds and planning an appropriate landing pattern. Also, choosing an alternate landing area by 2,000 feet allows you to assess potential obstacles and plan your new pattern. Follow your Landing Priorities. You can find comprehensive best practices for obstacle landings in Chapter 4-1 G. Below are critical points listing actions you can take when landing in or on common obstacles.
Water
Flare and PLF in case the water is shallow. After entering the water, try to stand up. If you cannot touch the bottom, swim out of your gear and leave it behind.
Trees
Keep your arms close to your body and your legs together. Use a half flare as you enter the tree. Be prepared to finish your flare and PLF in case you drop all the way to the ground. If you remain suspended, hold on and stay in the tree. Wait for help; do not attempt to climb down.
Buildings
If landing on a roof, flare and PLF. Cut away once you’ve landed. If landing under your reserve, contain it if it’s windy. Wait for help; do not attempt to climb down.
If hitting a building broadside, turn the canopy slightly to avoid a direct impact before flaring. Prepare to PLF, flare to slow down, and attempt to strike a glancing blow.
Power Lines
Drop any handles. Flare and PLF. Touch no more than one wire at a time.
Your parachute can conduct electricity, so if you are suspended in the wires, do not cut away and do not let anyone near you. Wait for qualified personnel to confirm the power is off.
If your feet are on the ground, disconnect the RSL and cut away, leaving your main canopy behind.