Diving Exit
A diving exit is where you launch out of an aircraft without climbing out and then achieve a stable entry into the relative wind. Set up in the door with your hips facing the relative wind as much as possible. Launch by placing your hips and chest into the relative wind in a neutral body position, oriented side-to-earth, looking at the wing tip. During the flyaway, turn your head left to look for your coach, who exited in the floater position.
Dive to Dock with Stairstep Approach
In larger groups, some jumpers will launch together or from a floating position outside the aircraft, but others will need to dive out of the plane from inside. The delta dive is used to produce forward and downward movement to close the distance when diving to a group in freefall. To dive to a group, maintain your arch, extend your legs fully and sweep your arms back and up slightly. The divers leave slightly after the floaters and dive down to the other jumpers to dock. Because divers often must cover long distances, they use a technique to safely dive to a formation that helps them manage their speed and descent. This is called the stairstep approach.
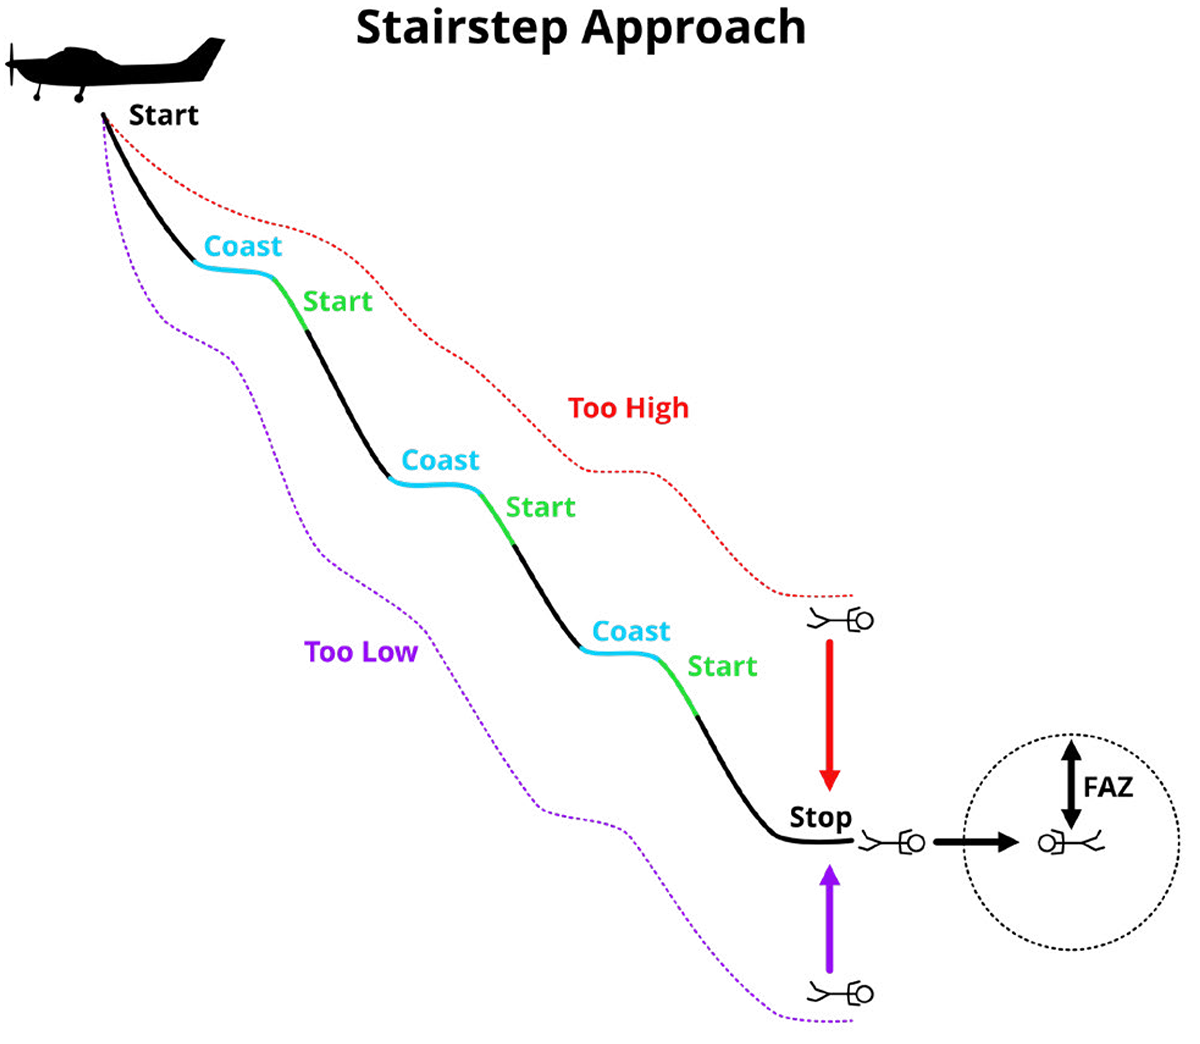
In this category, you will use the stairstep approach to practice diving to dock with your coach. After you exit but before starting to dive, hold the neutral body position for two to three seconds while slowly turning toward your coach. Use the start-coast-stop concept as you have before, but this time using start and coast repeatedly while diving, with a stop at the end.
To start, smoothly extend both legs fully with your toes pointed to initiate forward motion, steering to maintain heading. Arch more and sweep your arms back. Your hands should be above your hips. To coast, return to neutral and assess your horizontal and vertical distance from your coach.
Start again, adjusting your pitch based on the horizontal and vertical distance to your coach. To create a steeper pitch angle in your dive, arch more and sweep your arms up farther behind your hips. To create a shallower pitch angle in your dive, flatten your arch and move your arms slightly down toward your hips. After a few seconds, return to coast and assess your position. Repeat as necessary, maintaining altitude awareness.
To stop, extend both arms forward, flatten your arch, and drop your knees slightly, approximating the combination of the body positions for back and up movement. Aim to stop your dive on level with and approximately 20 feet away from your coach, just outside the final-approach zone (FAZ). The
FAZ is a buffer area that gives you room
for error in case your approach is too fast,
shallow, or steep. Before entering the FAZ you need to be level with your coach, then
move forward to dock. Anytime you approach larger groups, use the FAZ to help you
avoid collisions with other jumpers approaching the same formation. Remain clear
of the area immediately below and above any group. Watch for traffic and dive in a
straight line.
If you have built up too much speed in your approach, you will need to initiate your stop higher and more aggressively. If you go past the level of your coach, use the position for up movement while outside the FAZ to match the level of your coach and then move forward to dock.
If you stop in a position close to the FAZ, but higher than your coach, use the position for down movement to match the level of your coach. Once level, enter the FAZ and move forward to dock.
Improving Your Breakoff and Track
After you earn your A license and begin to jump with larger groups, plan your breakoff altitude conservatively. The minimum breakoff altitude for groups of five or fewer should be at least 1,500 feet higher than the highest planned deployment altitude in the group. For groups of six or more, minimum breakoff altitude should be at least 2,000 feet higher than the highest planned deployment altitude in the group.
During your breakoff sequence, scan for and steer clear of jumpers ahead of and below you. Look sideways and above for other jumpers in the immediate area during wave-off and deployment so you can steer clear under canopy as soon as you open.
CEP—Low-Turn Recovery
The low-turn-recovery technique is a canopy-flight emergency procedure. Practicing the skill will build muscle memory, allowing you to quickly neutralize a turn. Use low-turn recovery anytime you turn too low to the ground and do not have enough altitude to achieve a level wing without immediate input. A low-turn recovery requires neutralizing this turn.
To practice low-turn recovery, first check your canopy, altitude, position and traffic. From full flight, pull one toggle down to at least quarter brakes to initiate a 90-degree turn. To neutralize the turn, pull the toggle that is still in full-flight position to match the lower toggle, resulting in both toggles in a braked position. Hold the toggles even, then continue pushing them down evenly but forcefully for a braked flare. Anticipate that you may need more input than you expect to arrest the canopy descent. Slowly return to full flight for additional practice.
In a real low-turn emergency, immediately neutralize the turn, hold the toggles evenly in brakes, finish with a braked flare, and PLF. Refer to SIM 4-1 F for more advanced
techniques for this CEP.
Accuracy
Continue to improve your accuracy skills by using your notes in your logbook from previous jumps and the fundamental techniques covered in Category E. On final approach,
compare your projected landing point to your intended target. If you predict you will
land short of your target, flying in full flight provides the best forward speed to reach
your target. If you predict you will land past your target, make sure the area in front of
you is clear of obstacles. If you predict you might hit an obstacle and are still above 150
feet, gently turn no more than 30 degrees toward a clear area. If you are below 150 feet,
use a half-braked turn to avoid the obstacle, followed by a braked flare.
Perform the remaining unassisted landings within 65 feet (20 meters) of the planned target to meet the USPA A-License requirements (five total required).
Explain the procedure for an emergency water landing to your coach or instructor. Include when it is appropriate to have flotation devices. Look up USPA recommendations on procedures for an unintentional water landing in Chapter 5-4: Discipline-Specific Recommendations.
Owner Maintenance of the Three-Ring Release System
You should disassemble the three-ring system every month to clean the cable and exercise the material between the rings to prevent the riser forming a memory of its shape. Clean the cables with silicone spray or according to the manufacturer’s instructions to remove the sludge-like coating that develops on most three-ring release cables and causes them to bind, increasing the required pull force.
Line Stows
Make sure your rubber bands are in good shape and hold your line stows securely. Replace stretched, worn, or broken rubber bands.
Main Closing Loop
If your closing loop is worn and does not appear to be nearly perfect, it warrants replacement. The loop must have enough tension to keep the container closed in freefall. A loose closing loop could result in a premature deployment. Freeflying maneuvers increase the importance of closing-system security.
Adjust the closing-loop tension by moving the overhand knot or replacing the loop with the knot tied in the correct place. Use only closing-loop material approved by the harness-and-container manufacturer.
Clothing and Accessories
Check your jumpsuit or clothes to ensure they allow access to your main, cutaway, and reserve handles. You should tuck in shirt tails, jackets, and sweatshirts and zip your pockets closed. Your clothing should provide protection during landing and provide you with the correct fall rate based on your physical size. Tighter fitting clothing will increase your fall rate, while baggier clothing will slow it.
All skydivers wearing a round main or reserve canopy and all solo students must wear flotation gear when the intended exit, opening, or landing point is within one mile of an open body of water (an open body of water is defined as one in which a skydiver could drown). (Chapter 2-1.M)
Look up USPA recommendations on training following periods of inactivity in Chapter 4-2. Students have different currency-training recommendations than licensed skydivers.
Study for your A-license exam.
Aircraft-Radio-Use Requirements
Jump aircraft must have an operating radio, and the pilot must be in contact with air traffic control prior to jumping (FAR 105.13).
Notification Before a Jump
A jumper or the pilot must notify the appropriate air traffic control facility at least one hour but no more than 24 hours prior to jumping. Some drop zones have a written notification renewed annually for that location only (FAR 105.25 and AC-105-2E).
Aircraft Approved for Flight with Door Removed
Some aircraft are unsafe for flight with the door open or removed. Aircraft approved for flight with the door removed may require additional modifications and usually require additional FAA field approval. Other modifications to a jump aircraft, such as in-flight doors, hand holds, or steps, require additional field approval or a supplementary type certificate.